With ExCompare, you can easily compare two folders, or two file archives (.zip, .rar, .7z... even .exe), or a folder against a file archive. ExCompare provides a fast mode to greatly reduce data read operations and save your time, when you are just trying to find out possible differences between a backup and its original folder or file archive.
For additional features, please continue to read this help document, or check ExCompare home page.
ExCompare has been redesigned. Now you can start a comparison directly in its main window. You can drag two folders or file archives to the path boxes on its left panel, or click browse buttons next to the path boxes to choose folders or file archives, then click to start comparing them.
It now also supports saving current compare options to files, and loading options from those files. This is one of the big changes in new version. The old history feature has been removed, which wasn't working very well.
Starting from version 1.2.0, ExCompare no longer relies on file extensions to detect text files. It now uses the method that was first introduced in XSearch. A bug has been fixed when comparing unicode text files.
Starting from version 1.2.1, ExCompare has introduced an enhanced color theme system. On Windows 11, theme colors can now be applied to the title bar and window frame. On Windows 10, it can also automatically select a light or dark title bar based on the current theme.
The main window contains 4 parts:
This is the place to start comparing your folders or files archives. For detailed information about the options and features, see Compare Panel.
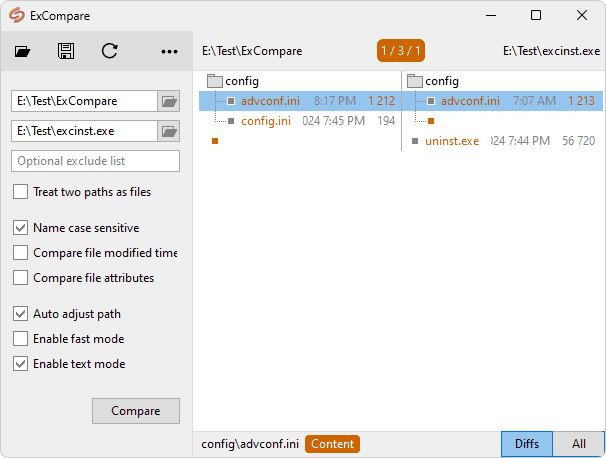
On the top bar of the right side, ExCompare displays global differences in the center, and the final paths of two targets on the left/right sides of this bar.
The global diffs can be in one of the following possible formats:
For example, in the screenshot of this section, the global difference means there are totally 3 differences: 1 file/folder (config.ini) exists only in first path, 1 file/folder (uninst.exe) exists only in second path. Therefore, 3 - 1 -1 = 1 file/folder (advconf.ini) exists in both paths, but they are different.
The two paths on top bar are the "root" paths of two folders/file archives that were compared. Each path can have additional path levels that were skipped when option auto adjust path is enabled.
The main part of the main window is the result list of comparison. It's divided into 2 parts horizontally for first and second paths, and keeps the file tree structure.
The list shows found differences or all sub-items. Right-click on any item in the list, a context menu will be shown. You can also double-click on an item to open the details window to check detailed information about the item.
Result list supports common hotkeys for quickly locating the next/previous difference, finding specific items, etc. You can right-click in the list and check the hotkey part of each context menu item, to learn what those hotkeys are.
If you click on an item in result list, the status bar will show what properties (such as name, modified time, attributes) have been used for detecting differences for the item.
Note: The differences detected by ExCompare could be incomplete due to option fast mode. For example, even if file names and contents are both different, fast mode could have skipped content comparison, therefore only name difference is detected.
This status bar shows the summary info such as the amount of selected items and all items, when there is no item selected, or more than one item selected in result list.
On the right side of status bar, the two switch buttons can be used to switch view mode for the result list: show only diffs, or show all items.
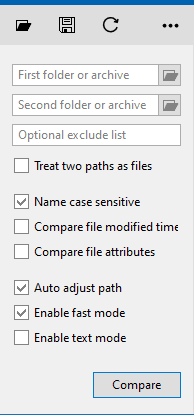
Basically, you start a comparison by clicking button at the bottom of this panel. But first, you will need to specify two targets and (optionally) adjust the compare options.
Click the browse button next to each path box, to choose a folder or file archive for the box.
The compare panel supports drag & drop, so you can drag any folder or file from Windows Explorer and drop it into one of the path boxes.
Use this box to specify one or more (space-separated) strings. All items (subfolders and files) in the 2 paths that match any of those exclude strings, will be excluded from comparison.
Besides folders, ExCompare is designed to compare the contents of file archives, not the file archives themselves directly (Windows has provided a file compare tool, FC).
By default, ExCompare treats files specified in the path boxes as archives, and tries to extract them to compare files/folders inside.
With this option enabled, ExCompare no longer tries to extract the files specified in path boxes; instead, it compares the two files directly.
This option is enabled by default. Disable it to ignore case-sensitive comparison for all file and subfolder names inside the chosen folders or file archives.
Enable this option to compare the modified times of files inside the chosen folders or file archives. Note that this option only affects files. ExCompare doesn't care about the modified time of folders.
Enable this option to compare the attributes (read-only, system, hidden, etc.) of files inside the chosen folders or file archives. Note that this option only affects files. ExCompare doesn't care about the attributes of folders.
Let ExCompare automatically skip "insignificant" path levels, so that two paths can still match even if they have different depths.
See Auto adjust path.
Enable fast mode to save time and reduce data read operations when comparing large files insider the chosen folders or file archives. Based on how the fast mode works, it can be affected by file name comparison, and the options "Compare file modified time", "Compare file attributes".
See Fast mode.
With this option enabled, if two files are detected as text files, ExCompare tries to compare them in text mode.
See Text mode.
On top of this panel, there are tool buttons that can be used to load, save or reset current compare options, and change global settings such as theme, font, language, etc.
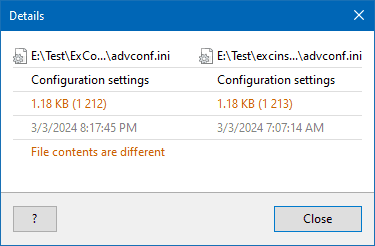
When you double-click on an item in the result list of main window, the details window is displayed.
It shows all the properties of two sub-items in the first and second paths, and uses different text colors to indicate which properties were used to detect differences and which properties were ignored.
Those text colors can be different for different themes, but they follow rules that can be easily understood:
The two sub-items have same value in this property.
This property was used for detecting differences. And the two sub-items have different values, therefore, they are different.
The two sub-items have different values in this property. But this property was not used for detecting differences.
It's either ignored by a comparing option (e.g., file modified time was ignored when option "Compare file modified time" was not enabled), or ignored by other properties in fast mode (e.g., file names were different, so file contents didn't need to be compared).
ExCompare can be started with command-line parameters to perform comparisons automatically, or simply set up the paths and options in the compare panel. It's smart enough to output the result to the command prompt window, where it was started when you set it to be running in the background.
Command line syntax:
Excompare.exe path1 path2 @loadfile +/-option +/-option ...
@loadfile can be used alone without any other parameter; it doesn't even need path1 or path2.
+/-option: One or more options. A plus sign (+) enables the option, while a minus sign (-) disables it. If you use an option without +/-, it is to enable the option (equal to +). If an option is not specified in command line, the default value is used.
Command line mode currently doesn't support exclude list. You can use @loadfile to load an options file that contains exclude list, if you need to use exclude list.
Available options:
Those are the comparing options in Compare Panel window, e.g., file = "Treat two paths as files", apath = "Auto adjust path."
As mentioned above, if an option is not specified in command line, the default value is used. For example, "Name case sensitive" by default is enabled, so only can disable it. You actually don't need to use or to enable it.
When using command line parameters to specify paths and options, by default the comparison won't start automatically. It just sets up the related options to the compare panel, then waits for the user to start the comparison.
If you use in command line, ExCompare will automatically start the comparison.
Perform comparison in background. No user interface will be shown if is used.
If this option is enabled, ExCompare always automatically starts the comparison, even if was not specified, considering there is no way to start the comparison manually since the UI has been completely hidden.
With the option , ExCompare returns a result code after finishing the comparison, 0 = no difference, and a non-zero value = difference(s) found or operation failed (note that return value isn't the number of differences). It can also output additional result information to the command prompt window when possible. See output to command line prompt (console) window for details.
Fast mode can greatly reduce data read operations and save lots of time when comparing large files.
If you already knew that the two locations you are going to compare are mostly identical, e.g., one is a backup of another, but you are not sure if they are totally the same, so you want to perform a quick check on them. Apparently, there is no need to compare every byte of each file in them.
With fast mode enabled, ExCompare can intelligently pick only parts of data to check, or even completely ignore data comparison.
Notes:
When two files (sub-items) are detected as text files, ExCompare tries to compare them in text mode, which means:
So two files can be seen as identical in text mode, even their sizes are different.
However, files with different encodings will always be seen as different. E.g., if you saved an ANSI text file as a UNICODE text file and compare them with ExCompare, they are different.
Even if text mode is enabled and 2 file are detected as text files, ExCompare can still decide to compare the two files in binary mode, if they are too big. Text mode comparing can waste lots of time because it cannot work with fast mode. So, ExCompare checks the sizes of two files, and switches back to binary mode if any of them is too large.
Specific path levels can be considered insignificant for a folder or file archive.
For example, if you have a folder "X:\NewFolder\MyData", and it's the only sub-item of its parent folder NewFolder - there is no other file/folder in NewFolder except MyData. Then NewFolder is an insignificant path level, because MyData can be safely moved out of NewFolder to be X:\MyData, makes the NewFolder an empty folder.
This happens to file archives more often. When you create an archive from a folder, the archive commonly will use that folder name as first level for all paths. Take "X:\NewFolder\MyData" as an example: if you create a zip file from MyData with 7-Zip, all your files are actually under the one and only folder MyData.
It can be a problem when you do a comparison between, for example, the above zip archive and its original MyData folder. In the archive, every path is MyData\***. But in the original folder, every path is \***. They will be seen as different because the first level of paths doesn't match.
With the auto adjust path option enabled, insignificant path levels are automatically skipped by ExCompare, thus it can ignore those redundancies and focus on "real" data.
Rules to decide if a path level is insignificant: (a) it is a folder; (b) it's not empty; (c) it has only one sub-item.
If ExCompare is started from a Command Prompt or PowerShell window, with command line switch , then in addition to returning an exit code (0 = no difference, non-zero = different or failed), it will also output the comparison result to the command prompt or PowerShell window. The result is in format like:
0 - Succeeded
1/3/1 Differences
Where the first line is result code, and the second line is the found differences in format of [first only]/[total diffs]/[second only]. If there is no difference, it can be:
0 - Succeeded
0/0/0 No difference
It can also be only one line if operation failed:
0x00000003 - The system cannot find the path specified: ***
When using ExCompare to output result to the console window, we normally should let the console wait for ExCompare to finish its work, before continuing to the next command. For example:
start /Wait excompare.exe path1 path2 +hide