Although XSearch 1.0 appears to have an interface similar to that of version 0.23, it was actually completely developed from the ground up, including the user interfaces and fundamental features.
Search panel is the most important area in XSearch. You use the search panel to specify options to search for files. Basically, you must at least select one folder to search for files in it. You can leave other settings at their default values, to let XSearch find all files in the folder you selected.
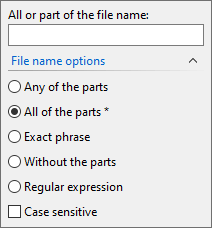
You can specify what to find in the first input box . It supports wildcard characters and space-separated multiple parts. So the following are all valid examples:
You can leave the file name box blank. If you don't specify any file name, it means that you want XSearch to search for all files in the selected folder(s).
The file name options work like Google advanced search, you use one of those options to tell XSearch how to use the file name parts. The default one is : a found file must contain all of those file name parts in its file name, but the order in which those parts appear is irrelevant.
matches a file when any of the parts is found in its file name.
treats all parts as a single string. Space is no longer a separator, but is part of the string as the space character itself.
doesn't use multiple parts. Space is a valid character in regular expression.
In Windows system, file names are all case-insensitive, but you can enable this option to force XSearch to perform a case-sensitive search.
Regular expression is a new file name option in XSearch 1.0, which can be used to do more complex searches. Since regular expression can exclude file names, the old -"exclude" option has been removed from version 1.0. For more information about regular expression search, see Regular Expression.
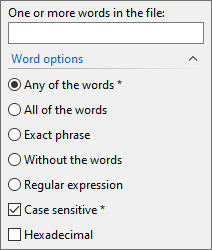
You can specify words in the input box , to let XSearch search for files that contain those words. The word box works like the file name box, only it doesn't support wildcards. Wildcard characters will be treated as the characters themselves, except for regular expression.
The word options work in the same way as file name options; however, please note that the default option is : if any one of the words is found, the file is matched.
When matching words with regular expressions, there are limits to be considered. See Regular Expression for more information.
This option is enabled by default.
Case-sensitive searches were supposed to save a lot of time in the old version; however, starting with version 1.0, word searches won't slow down too much with this option disabled.
When this option is enabled, XSearch tries to convert the inputted words to hexadecimal values. If a word can't be converted to a hexadecimal value, it will stay in its original form. Hexadecimal values are case-insensitive and can have optional prefix "x" or "0x", optional suffix "h", for examples:
Enabling this option normally won't break other features, such as word options, or case sensitive. Hexadecimal values can work together with normal words. For example:
XSearch will convert 1234 and 0x6688 to hexadecimal values, then pass the 2 converted values along with string_a and string_b to do word search. If the word option is , to match a file, the string_a, string_b and 2 hexadecimal values must all be found in the file. If is enabled, string_a and string_b must meet the need of case-sensitive.
However, hexadecimal values won't be affected by option . Actually hexadecimal matches are always case-sensitive because hexadecimal values are accurate.
Hexadecimal option cannot work with regular expression, it will be disabled if you select the regular expression in word options.
Hexadecimal option should not be used with the word option , because when that option is selected, the whole input is treated as a single string. But, if all words are hexadecimal values, separated by spaces (e.g., "fedd 231fh x3122"), "exact phrase" will work correctly with hexadecimal option.
Be aware that with this option enabled, a word like "abc" will also be converted to a hexadecimal value. All words that contains only valid hexadecimal charaters (0 - 9, and a - f) will be converted.
When searching for files with word matching, XSearch can automatically detect the possible encoding of each file, and search the words with the correct encoding. All files are supported, even the raw binary files. XSearch is smart enough to pick only the necessary encoding(s) to do word matching without slowing down the search speed.
The option "Unicode & UTF8" in the old version is no longer needed, and has been removed in version 1.0.
Word searches take many more times than normal searches, since XSearch needs to open, read, and check each of the files. Only perform word searches when it's necessary.
Before XSearch can perform a search, you must first select one or multiple folders in the box. This is the most important area, XSearch won't start a search if there isn't at least one valid folder specified.
You can input a folder directly into this box, or select a folder from the drop-down box. The drop down-box lists all the drives in the system, and the folders it has searched (history). You can click to browse and select a folder.
XSearch supports to perform one search for multiple folders. You can specify multiple folders in this box, each separated by . You can click the arrow icon on the button, then choose to select a folder to append to the existing folder(s).
XSearch version 0.1 used ';' (semicolon) to separate multiple folders; it has been changed to '|' since version 0.2 to avoid confusion (because folder names can contain ';' too). The ';' can still be used in most cases for compatibility; XSearch is smart enough to understand and make the correct choices.
You can also use environment variable strings in folders, e.g., %temp%.
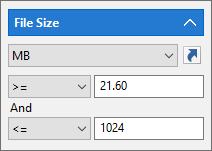
By default, the logic types in the size options section are all , and XSearch won't check file sizes when searching.
If you want to search files in a specific size or a size range, select a size type (Bytes, KB, MB or GB), then select a logic type other than in one or both two of the logic boxes, and input the desired file size(s).
There are two size areas can be used. You can combine them with logic AND, or use any one of them, and leave another one to be "Don't care".
The arrow icon next to the size type box is a quick selection popup menu, you can click it to select a predefined size range, such as "Large (128 MB - 1 GB)", XSearch will automatically fill in the size options for you.
It's always recommended to use the size type "Bytes", because other types such as KB, MB or GB are not accurate values.
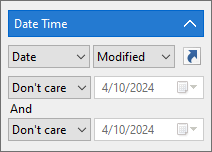
Date time options are similar to the Size options; by default, the 2 logic boxes are all , so XSearch won't use date time. To search files in a specific or a range of date and/or time, select the date time type, then select logic type(s) and specify the related data time.
Like Size options, XSearch provides two date time areas so you can combine them with logic AND, or use just one of them and leave another to be "Don't care".
You can let XSearch search for files by date only, time only, or both date and time. For example, if you select and specify the time to be 12:00 AM, it will get the files that the (specified type of) time is 12:00 AM, and doesn't care about the date.
There is also a quick selection icon next to the date time type box in this section, You can click it to quickly select a date time range, such as "this week".
You may have noticed the option Times include seconds in the quick selection popup menu, see Use seconds when searching by date time for more information.
The advanced options are useful when you want to get only the files with special attributes. All options are selected by default, if you disable all options in this area, XSearch won't find any file.
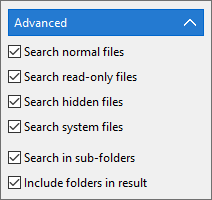
These options let XSearch search for the files with the selected attributes.
This is a very important option. If you disable it, then XSearch won't search files in sub-folders of the folders you specified. It's not recommended to disable this option unless you know what it means.
You may have already noticed that XSearch (and most other search programs) will also list the found sub-folders in the search result. Sometimes it's just useful to only show the found files, so we provide this option in XSearch. If you disable this option, XSearch will only show found files in its result window.
By clicking the button, XSearch starts to search with all the options you have set in the search panel. This button will become during searching. You can click it to cancel the search at any time.
If you click on the arrow icon on this button, it will pop up a menu and give you more options:
Perform a search on the found items with new search info, i.e., filter the search result.
XSearch lists found items in the list view after it has done a search or loaded a search result file. You can then specify new search info, such as new file name parts, new date time options, etc., and choose this menu item to let XSearch get a new result from the existing result. Items that don't match the new options will be removed from the result.
All options in the search panel, except the "Search in" area, will affect the final result when using the "search in result" feature. The folder(s) in "Search in" will just be skipped.
XSearch is smart enough to not start a "search in result" if nothing has been changed in the search panel.
This operation can be done multiple times, each time with different search info.
Undo the previous "search in result" operation, restore one step back, until restored to the original search result before all "search in result" operations.
A number on the right side of the "Search in result" menu item indicates how many steps the "search in result" operations have taken. The number of "search in result" operations is unlimited, and you can always undo them until you reach the original result.
You can click the button to cancel a "search in result" operation too.
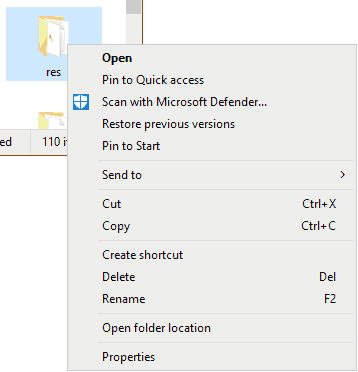
The right-click context menu is one of the important functions of XSearch. Like Windows Explorer, you normally don't need to use main menu to operate the found items; instead, you use the context menu.
Starting with version 1.0, you will be provided the system context menu when you right-click on selected items. This is the shell context menu obtained directly from system, with menu items such as "Send to", "Share", "Pin to Quick aceess" provided by Windows, and other shortcut menu items provided by third-party programs.
Of course, XSearch also modifies the menu for its own features, such as adding "HexView", and "Open containing folder" because the system doesn't support opening the containing folders of multiple selected items. XSearch actually will replace the menu items "Copy", "Cut", "Properties" etc., as XSearch works better for those shell operations.
System context menu can be disabled in → so that XSearch will use its own context menu. Under certain circumstances, XSearch can fail to obtain the system context menu for selected items, and it will fall back to its own content menu too.
This lightweight context menu provides enough functions for operating the found files and folders, and has no any less-used, sometimes annoying entries. Some people may prefer it to the system context menu.
Like in Windows Explorer, if you right-click at any blank space between items in the list view, you will be provided a shortcut menu to help quickly change view mode, etc.
Search results can be saved by choosing menu → . The saved search result files can be loaded later by choosing menu →
You can also export the current search result to a CSV file or HTML table, by choosing → The exported file can be loaded by Microsoft Excel or other programs.
Search result files can be opened by XSearch directly when you double-click on them, if the file type has been registered to the system. See Shell extensions.
When saving search result to file, it's possible to save only search info (search options), by enabling the option "Save search info only" in the Save As dialog box. This is useful when you only need to save your search options so that you can read them back by loading the result file.
XSearch supports common file operations on the found items in its result window, such as copy, cut, rename and so on. Common hotkeys are also supported.
You are also allowed to drag the selected items to desktop, any explorer window, or any program that supports drag and drop.
You can switch the view mode of the result window, such as Details, List, Tiles, Icons and large Icons, under the menu .
You can sort the result by choosing menu → , and group the result by choosing menu → .
Sorting can also be done by clicking on column headers in the result window. Clicking on those column headers will also affect groups if groups have been enabled for the result.
XSearch remembers the last sorting and grouping columns. A new search will use the last sorting/grouping columns automatically.
XSearch doesn't need to be installed. It won't register itself to the system, so that search result files created by it cannot be opened directly when you double-click on them in Explorer windows, because Windows doesn't know what those files are.
You may also want to add XSearch to the context menu of Windows Explorer, so that you can right-click on any folder and choose XSearch to search files in it directly.
Those can be done by using the menu →
Choose to register search result file to system, so that you can double-click to open them directly. Or, deregister the file type if you no longer need this feature.
Choose to add XSearch to shortcut menu of folders in Windows Explorer, or remove it.
Unlike old versions, XSearch 1.0 doesn't need administrator privileges to change these shell features.
Default Search is the default search settings that XSearch will use to initialize the search panel at startup.
To set up default search, set the search info on the search panel, then choose menu → → The current search info in the search panel will then be saved as the default search, and next time you start a new instance of XSearch, this info will be used automatically.
You can choose to clear default search. This will make XSearch use default (original) search options at startup.
It's possible to let XSearch automatically save the search info on the search panel, by enabling the menu item . When this feature is enabled, XSearch saves the search info before it's closed and loads it back at startup.
If XSearch is started with command-line parameters to load a search result file at startup, the default search won't be used. See Command line switches.
HexView is a built-in tool of XSearch for viewing files in hexadecimal. You can right-click on a found file and choose "HexView" in context menu to open the file in HexView.
It's possible to configure this menu item to use an external program, by choosing menu → to open the "Customize HexView" window.
Select from the drop-down box, then click to select a program.
The name of the selected program will be automatically obtained as the menu caption to replace the default caption "HexView". You can use any string you want. If you leave it empty, the default caption "HexView" will be used.
The program path can have parameters, per the program's needs.
Normally, the target file path will be appended to the program path. This is supported by most programs. For example, if the program path is "X:\Path\Program.exe", when you choose menu item HexView (now it can be a different caption though), XSearch will run a command like this:
If the program needs parameters that must be placed after the target file path, you can use a special parameter "%1", which will be replaced by the target file path, instead of appending the target file path to the end of program path. For example, if you specify the program path as:
The run command will be like:
Choose menu → to open the options window.
This option is enabled by default. If you disable it, folders will be treated as files, so they will not be kept at the top (or bottom in descending order). Most search programs, including XSearch will keep the folders at the top/bottom of the list when you sort the found items. XSearch provides this option so that you can overwrite that behavior.
When XSearch loads a previously saved search result file, it checks each item in the result file, and removes items that no longer exist in the system.
XSearch normally performs sorting after a search or loading is done. If you enable this option, XSearch will insert each found or loaded item directly into its sorting position during the progress of searching or loading. This is slower than sorting after all items are ready, but it's the default behavior of Windows search.
Use grid lines in the result list view. Only "details" mode can show grid lines.
This option is enabled by default. It makes XSearch use the system context menu, when you right-click on the found item(s).
If you disable this option, XSearch will use its own context menu, which is lightweight, but doesn't have some menu items provided by the system, such as "Share","Send to", "Pin to Quick access" etc.
Even if you keep this option enabled, under certain circumstances, the system context menu can be unavailable for the selected items. In this case, XSearch will fall back to using its own context menu.
See also: Right-click Context Menu.
This option is enabled by default. XSearch automatically updates the icon of "Open" button (first button) on the toolbar to indicate which program will be used to open the selected file(s) when you click this button.
If you disable this option, the open button will not be updated and will always use the default icon.
When you export search results to a CSV or HTML table files, the file size columns of items will be in their original byte values by default. If you enable this option, file sizes will be formatted to size strings such as "XX KB", "XX MB" etc.
Search history, such as the inputted strings in the file names, words and folders boxes, will not be saved if you enable this option.
This option also applies to the "find" history of HexView.
Note: Existing search history will NOT be automatically deleted after search history is disabled. They will be hidden, but the entries are still there, and will be restored when you re-enable search history. XSearch will ask you to clear search history when return from this Options window, or you can choose menu → to remove them at any time.
You can use XSearch in command scripts (.cmd or .bat files) with its command line switches. command line syntax:
XSearch.exe [Folder] /switch value ...
Example: XSearch.exe X:\Path\to\folder
If you specify a folder in command line, XSearch automatically uses it as the folder in the "Search in" box.
It can also be a search result file. XSearch will load the result file instead. In this case, it's same to the switch /in filename.
Example: XSearch.exe /in X:\Path\MyResult.xsearch
XSearch loads the specified result file when it starts.
As mentioned above, a result file can also be specified in the [Folder] position, e.g., XSearch.exe X:\Path\MyResult.xsearch.
If XSearch is to load a result file, the "default search" won't be used.
Example: XSearch.exe /out X:\Path\MyResult.xsearch
XSearch performs the search, saves search result to the specified file, and then quits. The whole progress is running completely in the background; no UI will be displayed.
XSearch will perform the search immediately after its main window is displayed, without waiting for you to click the "Search" button.
Starts the HexView and opens the file specified in filename. If you do not specify a file name, then it starts a blank HexView window.
File/folder names must be enclosed by quotation marks if there are spaces in the path, e.g., "D:\My Folder".
Switches can be combined. Examples:
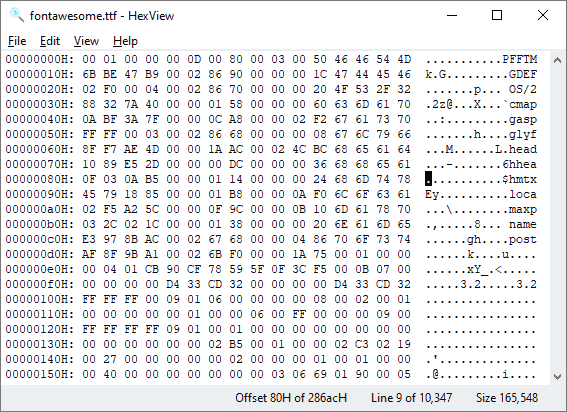
XSearch provides a HexView tool to help view files in hexadecimal. With its buffering technology, HexView can open huge files (GB, TB) immediately, and there is no size limit.
To view a file in search result window, right-click on the file, then choose
HexView can be used to view any file, not only those files in the search result of XSearch. You can choose menu → or in HexView, to open a file.
HexView can also be used directly without launching XSearch, by using the command line switch /hexview [FileName]. For more information, see Command line switches.
HexView works like a read-only editor, and supports most of the shortcut keys and mouse selection of a common editor.
Choose menu → to copy selected bytes to clipboard; to copy selected bytes in hexadecimal to clipboard. You can also use the hotkeys Ctrl+C or Ctrl+Shift+C.
HexView supports vertical selection mode. You can switch selection mode by choosing menu → .
Choose menu → to specify column width, i.e., bytes per line.
Choose menu item → to search in the opened file.
Note: HexView doesn't support to search multiple words. The input is seen as a single string, and space characters in the string are treated as the spaces themselves.
This means that if you enable the option in the find dialog box, the string must contain only valid hexadecimal values. But it can be in multiple parts separated by space characters, e.g., "1234 56fa".
is a useful command. You can use it to jump to a specific offset of the file quickly and precisely, without using the scroll bar.
Starting with version 1.0, XSearch supports regular expressions for matching file names, as well as matching words in files.
In most cases, regular expression search is slower than normal search, especially when searching for words in files. But regular expression is powerful, so it can perform complex searches.
The regular expressions in the file names box and words box should not be in regular expression literal; they are pure regular expressions, e.g., ".*\.txt".
Regular expression matches will be affected by option . If case-sensitive is enabled, the regular expression will also match cases. However, it can overwrite case-sensitive option by using "(?i)" in it, e.g., "a((?i)b)c" will match "abc" and "aBc".
Regular expression is designed for text strings, therefore, it has limits when matching words:
Text format doesn't mean the file must have the extension ".txt". Many files are in text format that is readable, such as ".html", ".log", ".xml" and so on. XSearch can automatically detect if a file is in text format. If a file isn't in text format, it's ignored in regular expression matches.
Unlike normal searches, a regular expression match must have all text loaded into memory to perform the search. XSearch will try to load the whole file into memory, but if the file size exceeds the buffer limit, it will be ignored. In most cases, this is not a problem because text files normally won't be too big, and XSearch uses a 256 MB buffer limit by default. This limit can be changed by modifying advanced settings.
Regular expression matches for words also supports multiple encodings, such as Unicode, UTF-8, and ANSI. XSearch automatically detects the encoding of files to perform regular expression matches.
Advanced settings are in "Config\advconf.ini". These settings shouldn't be changed in most cases, and can only be changed by modifying advconf.ini directly. There is no UI to view or change these settings.
If XSearch works well for you, it's always recommended to keep these advanced settings unchanged.
This section only describes some of the advanced settings, as changing their values can be helpful under certain circumstances.
XSearch has two sets of toolbar icons in 24*24 and 32*32. This option can be set to <= 24 or > 24 to force XSearch to use the 24*24 or 32*32 icons. 0 means to auto choose, basing on current DPI.
The column width of view mode "list" (the 2nd view mode, right after "details"). Don't set this to 0 to let the system decide column width, as that can cause the column width to be too big or too small, depending on the file names of found items. It's always better to specify a fixed value here.
Max history entries can be stored and displayed in the file names, words and folders boxes of search panel, and the find box of HexView. The oldest entry is removed to make space for a new entry when this limit is reached. Range: 0 - 256. Setting this option to 0 isn't recommended; instead, you should use the common option .
The size limit, in MB, of files to be loaded into memory for regex word matches. Files that are larger than this limit, will be ignored when performing regex word matches, even they are in text file format. Range: 1 - 1024.
The size limit, in MB, of bytes to be copied to the clipboard. However, this won't stop you from copying huge amounts of data. It's a boundary to show a warning when you try to copy more bytes than the limit. Setting this option to 0 can suppress all warnings, but it's not recommended.
By default, XSearch handles Word documents (.docx) by extracting their content and searching words in the content instead of the raw .docx files. If you set this option to true, .docx files will no longer be parsed; they will be searched directly as common files.
Although we have designed a theme system, which is used by our other projects, XSearch cannot fully support the theme system. If you want, you can force enable theme, by specifying a theme name here. Available theme names: Light, Dark, Blue, Green.
The option sections, such as "File name options", "File Size" etc., in the search panel, can be expanded and show additional options.
If you changed the default setting in an option section, its title will become bold. Changing the default settings will affect search results. You can easily know if anything was changed in an option section with this feature.
During searching or loading a result file, you can press Pause button on your keyboard to pause the progress, and press it again to resume. The button is actually the hotkey for menu → .
It's always highly recommended to use the 64-bit version of XSearch whenever possible. If you use the 32-bit version on a 64-bit Windows, some context menu entries can be missing when it uses the system context menu for right-clicking on found items, which is the default setting of XSearch.
This is because on a 64-bit Windows, some system components and programs (e.g., the Microsoft Defender) don't provide the 32-bit shell context menu access entries.
By default, XSearch allows you to specify the time in the format HH:MM when searching by date time, which means it doesn't care about the seconds in the file time. You can click on the quick selection icon and choose , to enable XSearch to use seconds in time, such as "12:00:01 AM".
The search result list view will also display seconds in date columns when this option is enabled.
By using XSearch, you can perform many advanced searches that Windows Search and most other search tools can't accomplish.
For example, if you want to get all non-ready-only files in a folder, you only need to change the settings under the options section, clear the selection of option (and if you only want it to return files, clear option "Include folders in result" too).
XSearch is a free software. You can use this software without paying a fee.
Your donations are always important to us. Donations can help us improve the software, and create new products.